
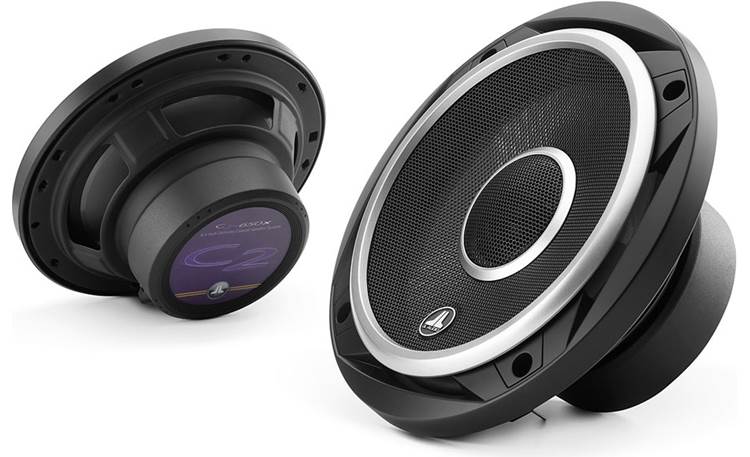
A good audio system in your car adds fun to the driving experience with some awesome background tunes. But the factory car stereo system, though good for average listeners, doesn’t always hit the right spot. And for audiophiles, a good car audio system is not even a subject of discussion.
Sometimes you need to change the car stereo system entirely. Or just replace the factory speakers with quality aftermarket speakers, and you are good to go. Whichever the case, you’ll want to get speaker replacements that fit right into the housings in your car. And it all starts with knowing the measurements of your car speakers.
Knowing how to measure car speakers is a handy skill for every car owner. It can save you lots of purchase returns and modification work. And luckily, taking car speaker measurements isn’t that hard. And below is all you need to know to measure car speakers like a pro.
Why You Need To Measure Car Speakers
You could be wondering why you need to measure car speakers rather than just buy any aftermarket speakers meant for your car model. Well, although most manufacturers produce car speakers using standardized sizes, there are noticeable differences between speakers, even within the same size range. The size differences could be by a fraction of an inch or several millimeters but will significantly affect the fitness of a speaker within the speaker housing of your car.
Our guide on the best car speakers runs through high quality and durable speakers on the market.
Also, you may be surprised to find out that a 5.5″ speaker is not exactly 5.5″ nor a 6.5″ a 6.5″. These measurement differences exist due to varying definitions of speakers’ physical dimensions (more on these later), such as cutout diameter being confused with speaker’s diameter.
Therefore, knowing which speaker dimensions to consider is important. And, more importantly, learning how to take these measurements. And, you need to know and do all the measurements before going out shopping for new speakers.
Also, factory car speakers have unusual heights or modifications geared towards making them work with a specific car model. Hence, they do not always match aftermarket alternatives, and you need to consider more factors beyond the diagonal measurements.
We are sure you won’t want to install some hi-end speakers that sound great, only to realize you can’t close the car door without damaging them nor roll down the window. So, stick around as we discuss how to measure car speakers – it’s a fantastic DIY project too.
What You’ll Need
Measuring car speakers isn’t complicated, but you need to be highly accurate. And you know well that accuracy boils down to the right tools for the job. You can either get measuring instruments calibrated in inches or centimeters, but we advise you to take the measurements in inches, as most manufacturer measurements are, anyway. That said, below are all the tools you need for your car speaker measurement project:
- Transparent ruler
- A metal tape measure
- Panel removing tools
- Screwdriver
- Notepad, and
- Pen or pencil

Important Dimensions for Car Speakers
Car speakers’ manufacturers list numerous dimensions for their speakers, but not all those measurements matter during installation. And as earlier noted, you need to differentiate what matters to the speaker design and installation process. In addition, you’ll need to take multiple measurements to help you find speakers that fit flush in specific areas of your car. Here are the dimensions you’ll need:
1. Speakers’ Diameter
Contrary to popular belief by most people, the diameter of a speaker refers to the diagonal length of the frame and not the speaker’s cone. In some cases, especially for 4-hole speaker frames, the diagonal distance between holes on opposite sides is equal and can serve as the speaker’s diameter. But to be safe on screw holes allowance, you better take the diagonal frame length. The best tool for this dimension measurement is a transparent ruler.
2. Mounting Depth
Mounting depth refers to the length between the speaker’s mounting flange and the base of the magnet. Ideally, the mounting depth shows you how deep your speakers get inside the housing. Here, the goal is to have an accurate housing depth to avoid buying speakers with excessive mounting depth.
It would be best to get speakers not too deep to bump into surfaces beneath it to avoid damaging the housing, the speaker itself, or requiring too many modifications to fit flush. And remember, in most cases, speakers with larger mounting depths tend to have better performance over shallow speakers. And for this measurement, the metallic tape measure will do the trick.

3. Mounting Height
Most speakers will stick out on both front and back ends, especially the coaxial types with tweeters. The front-end sticking is called the mounting height of the speakers. It’s the distance between the mounting flange and the highest front point of the speaker, best measured using a metallic tape measure.
Mounting height is critical as it determines the size of speaker grills you need and the possibility of objects bumping on the speakers if you won’t install grills. Unless you can’t help it, go for speakers with low mounting height to ensure the height fits flats with the height of the allotted mounting space.
4. Cutout Diameter
Cutout diameter is the distance between the speaker flange and the point where the speaker’s basket starts dropping. Technically, it’s the largest diagonal length at the back of the speaker or the largest diameter of the bottom side of the speaker flange. It shows how much room the speaker needs to fit in the desired slot and directly affects the positioning within the mounting hole.
It’s advisable, and mostly the best option, to have a cutout diameter smaller relative to the mounting hole. And it’s for two reasons; you get some room to position your speakers optimally and avoid damaging the speaker’s basket in a too-tight situation. In the worst-case scenario, a tight fit may distort or damage the basket of your speakers. And for the cutout diameter, you can use either a transparent ruler or a metallic tape measure.
5. Screws’ Diameter
Screws’ diameter sometimes doesn’t matter much as you can drill as many new holes as the mounting space can accommodate. But, to ensure the stability of your new speakers within the mounting hole, it’s essential to measure the distance between screw holes. The transparent ruler will serve best in this case, as you need higher accuracy to pinpoint holes’ locations.
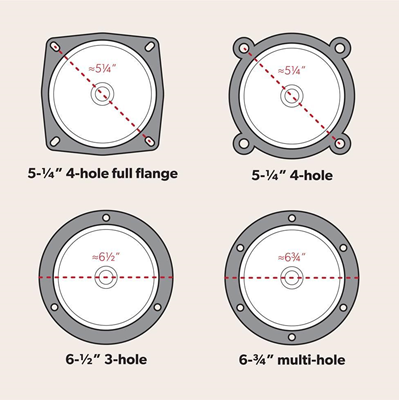
The screw’s diameter is the length between diagonally opposite screw holes, and it’s easier to measure for even-numbered holes. For instance, four-holed speakers are easier to measure than three-holed are. And you can use the speakers’ factory specifications when the going gets too tough.
But the bottom line is you need some accuracy here to avoid offset mounting or having the screw holes outside the ring’s outer diameter. And in cases where you’ll install speakers on the distance adapter rings, you need to drill new holes to match the new speakers’ mounting needs.
How to Measure Car Speakers
Measuring car speakers is straightforward but can sometimes get tricky, especially if you’re new to car speakers. Something to note here is that there may be some confusion in the standard measure for car speaker sizes at times among manufacturers. And as we discussed earlier, some manufactures will give screw holes’ diameter as the speaker size, and in some extreme cases, the cutout diameter is confused with speaker diameter. And some car manufacturers will even use non-standard speaker sizes that better fit with the dimensions of the car model.
Many car speakers’ manufacturers and retailers have extensive databases for ideal speaker sizes and types for specific car models. Even so, you’ll need to know the actual specifics of your speaker mounts to get the best fit. Besides, the absence of an industry standard for car speakers means there can be a big difference between listed dimensions and what can fit in your car. Below are the steps of how to measure car speakers:
1. Access and Remove the Old Car Speakers from Their Housing
You’ll need the panel removing tools and a screwdriver for this step. A word of caution here, switch off your car to ensure no power is flowing to the speakers for apparent reasons. Remove any cover or grill in front of the speaker by either unscrewing or popping them out.
You should be able to access the speaker mounting screws once the covers are out of the way. Unscrew them. Carefully pull the speaker out of the mounting hole, and disconnect the wires attached to it.
2. Measure the Car Speaker’s Diameter
Have your notepad, pen, transparent ruler, and the metallic measuring tape for this and following steps. Get enough working space and place your speaker in an upright position. The magnet side should be on the surface of the bench and the cone-side facing up.
Measure the widest point of the speaker frame from one edge to the other. Most speakers have their diameter/size stated in inches, and hence it would be best to measure in inches.
If the speaker is not round-shaped, please take the measurements of the widest points on every side of the frame. A pro tip here, if the speaker has four mounting holes, the diagonal distance between opposite holes and the frame diameter are equal, and hence you can measure either.
3. Measure the Car Speaker’s Mounting Height
Maintain the speaker’s upright position to measure the mounting height. Here, we need to know how far the speaker’s highest position is to the mounting frame bottom, a length better measured while looking at the speaker from the side. Place the ruler or measuring tape from the bottom of the mounting plate to the highest point of the speaker, and record your readings in inches.
4. Measure the Car Speaker’s Mounting Depth
Again, maintain the speaker in an upright position. Use the metallic tape measure to get the length from the end of the magnet to the mounting frame (a flat piece of plastic/metal around the cone). The mounting depth shows the speaker’s safe depth into the mounting hole and helps you get the maximum speaker size that won’t touch the housing base.
You can also measure the actual housing depth to see if the new speakers can get deeper without bumping into other components within the hole. Any new speakers should have a mounting depth shorter than the depth of the mounting hole.
5. Measure the Car Speaker’s Cutout Diameter
Turn the speaker upside down so that the magnet faces up, and the cone rests on the working bench. Use the transparent ruler to measure the widest part of the cone attached to the backside of the speaker’s frame. Record the measurement in your notepad as you have done with the other dimensions.
If the speakers are non-round, measure the widest points of the cone from each side; the shortest and longest frame sides in oval-shaped speakers. Remember, the cutout diameter should be smaller and at most the same size as the mounting hole to keep the speaker’s basket safe during installation.
6. Measuring the Screws’ Diameter
Most aftermarket car speakers’ manufacturers make speakers with equal or almost similar screws’ diameter with factory speakers. So, you can be lucky and find a speaker upgrade that matches the screw holes of your car factory speakers. Essentially, you’ll need to know the inner and outer diameters of the screw holes of the old speakers to have a clue on what to look for while shopping.
For outer diameter, measure the widest edges of the diagonally opposite screw holes, while the inner diameter should be the length between the inner edges of opposite holes. In most cases, the outer screw holes’ diameter will be equal to or slightly smaller than the speaker’s diameter. And for speakers with a recessed lip around the side of the screw holes, the cutout diameter should be equal to or slightly smaller than the inner screws’ diameter. Else, the speaker won’t fit in the hole.
So, technically, the inner and outer screws’ diameters show the minimum and maximum speaker diameters you can mount in your car without the need for housing modification. If the speaker shape is anything different from round, then measure the inner and outer screws’ diameters for all sides.
7. Check the Screw Pattern
Apart from matching the screws’ diameter for old and new speakers, you can also match the screw pattern to eliminate the need for drilling new holes. And for a screw pattern, you can either measure the holes’ distances or trace the design on a sheet of paper. Whichever way you chose, shop for speakers with similar screw patterns. But we prefer tracing as it has some visual comparison benefits, and you can see if there is a match even before measuring.
Consider Modifying the Speaker Housing
The end goal of measuring car speakers is to eliminate unnecessary modifying the mounts or housing to fit new speakers. What if you don’t find speakers that match your car needs or any practical recommendations from car speakers’ manufacturers?
Then, you either forfeit your upgrade or replacement dreams or modify your car to fit available speakers. The modifications could be on the speakers themselves or the housings in the various parts of the vehicle. Yes, it comes with extra work, but the results will be worth the effort.
Other Metrics to Consider
When replacing or upgrading car speakers, you should consider other parameters to ensure you get the best performance from your new setup. Below are some other important metrics to consider, beyond speakers’ physical dimensions:
1. The Car Stereo’s Power Rating
Speakers not only vary in size but also other factors like power ratings and sensitivity. Ideally, two speakers could be having similar physical measurements but different power needs and hence fit different stereo systems.
Speaker-stereo power mismatch results in poor sound output, something you better read about than experience. Conventionally, high-powered stereos go well with low-sensitivity speakers and vice versa. So, when choosing the right speakers for your car stereo system, get those that match its power rating.
2. The Type of Screws for Mounting the Speakers
The type of screws may not matter in selecting matching speakers for your car, but they can save you tons of modification work. Getting exact mounting screws as those of old speakers ensures you don’t need to drill new holes. And if you get those that match both in size and shape, the better, as they will fit in the old holes like lock and key and be as tight as required.
3. The Weight of the Speakers
The weight of the speakers becomes an important factor depending on where you intend to mount them. For instance, speakers for mounting inside door panels need to be lightweight to reduce adding too much weight to the doors. But the weight isn’t an issue for speakers for mounting in other parts of the car.
Conclusion
Measuring car speakers is a crucial skill. It comes in handy when you need to replace a worn-out car speaker or upgrade your entire car stereo system. Generally, you only need to know which car speakers’ dimensions to consider and take the measurements. And finally, measuring the screws’ diameters and shopping for speakers that match these measurements. And now that you know how to measure car speakers, finding the right speaker fit for your car won’t be a problem anymore.
Besides, it can save you tons of modification works and the possibility of damaging the speakers during installation. Also, you can access the available speaker sizes databases by car speakers’ manufacturers and retailers for clues on where to start your shopping.
You may also be interested in: