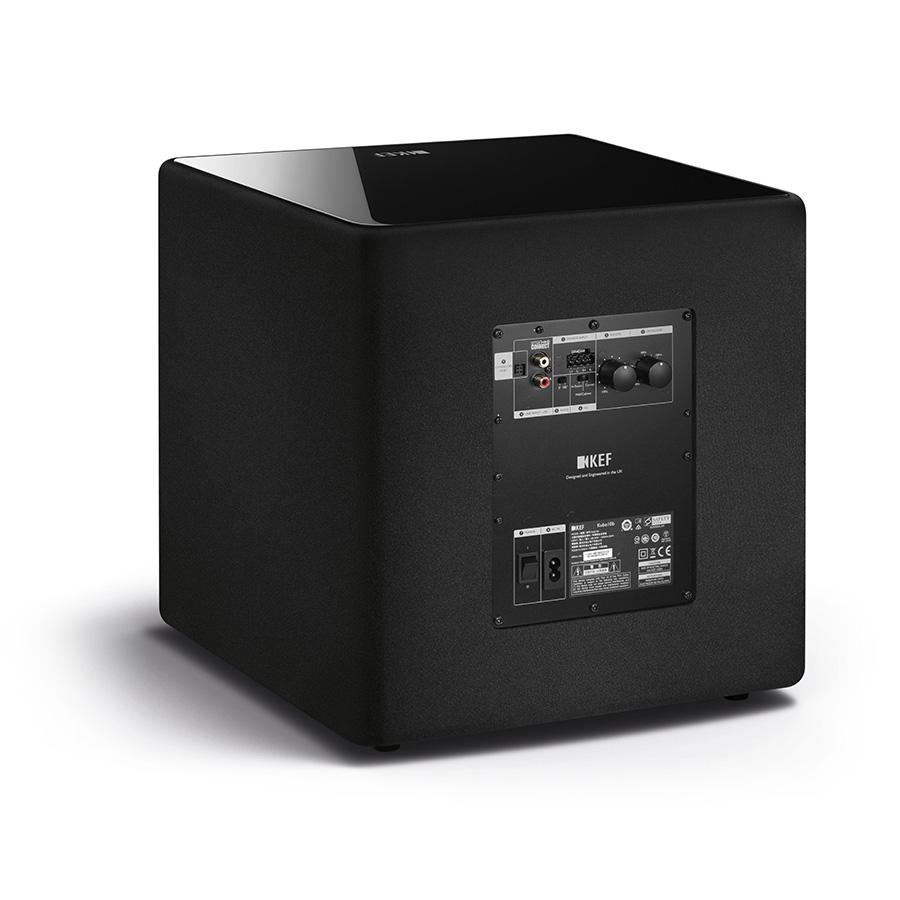
One way to get a very good audio experience is by connecting the subwoofer to the speakers of your home theater or surround setup. This might confuse users at times, especially if the receiver doesn’t have a subwoofer output connection. In this case, a speaker-level output might help.
So what is a speaker-level output, and how does it work? We will discuss all that in-depth in this article. Hopefully, by the end, you will be able to connect your subwoofer to your home theater without any problems.

What Are Speaker-Level Outputs?
Speaker level outputs are used to provide signals to a subwoofer if there is no source to connect to the subwoofer on a receiver. In older receiver models, subwoofers are sometimes connected to the speakers by default. However, it can also be done intentionally Connecting a to achieve high natural bass with no lag and to achieve a high music quality.
When a subwoofer is connected to a stereo amplifier or receiver, sound signals pass through the subwoofer and the subwoofer passes this signal to the main speakers.
A subwoofer helps emit low-frequency audio. Why would a connection between speakers with a high-level connection and the same audio signal be recommended? One main reason why the connection between a subwoofer and speaker level output is used is because of some receivers that do not have the subwoofer output connection available.
Even if there is no output connection available on the receiver, the connection is possible with your subwoofer. You don’t have to ditch your subwoofer, just because of the bad audio experience you get. You can use a speaker-level output at the back of the receiver.

These line-level inputs ( which are voltages designed to accept voltage levels provided by line inputs) are different from the low-level connection that the subwoofer has. In most cases, for low-frequency effects, the subwoofer is connected to the LFE connection.
If you want an accurately-timed bass emission that works well with the speaker and subwoofer, connecting to the speaker level outputs might be a great option. This is why the connection to the subwoofer by the speaker level outputs is a great option for streaming and listening to music.
One audio signal is transferred to all the equipment connected at the same time instead of multiple signals transferred and received by the speakers and subwoofers. What this connection does is filter out low-frequency audio tones that emit bass softly. Establishing a connection between a subwoofer and the speaker level outputs would enhance the sound effects and sounds like explosions and crashes are made subtle.

How To Connect The Subwoofer To Speaker Level Outputs
Now that you have the idea of how a subwoofer works, it’s time to secure a connection to achieve the audio quality that you drive. We have curated all the processes into a list of steps you can act on.
By following the below steps, you can pair an old receiver with a subwoofer that doesn’t come with low-level outputs. You can choose to connect and disconnect the subwoofer anytime you want a great musical bass.
To establish a secure connection, here are the steps to take:
1. Confirm the requirements and specs of your receiver
Before you try to establish a connection to the speaker level outputs, you might need to check what the receiver accepts or not. Checking would allow you to see both input and output connections allowed on the receiver.
However, if the receiver you use is part of the latest model, you can find a subwoofer input already built. Connection is easy when you have a dedicated subwoofer input. This means that the receiver is made for connection to the subwoofer to streamline the LFE audio signal for subwoofer bass emissions.
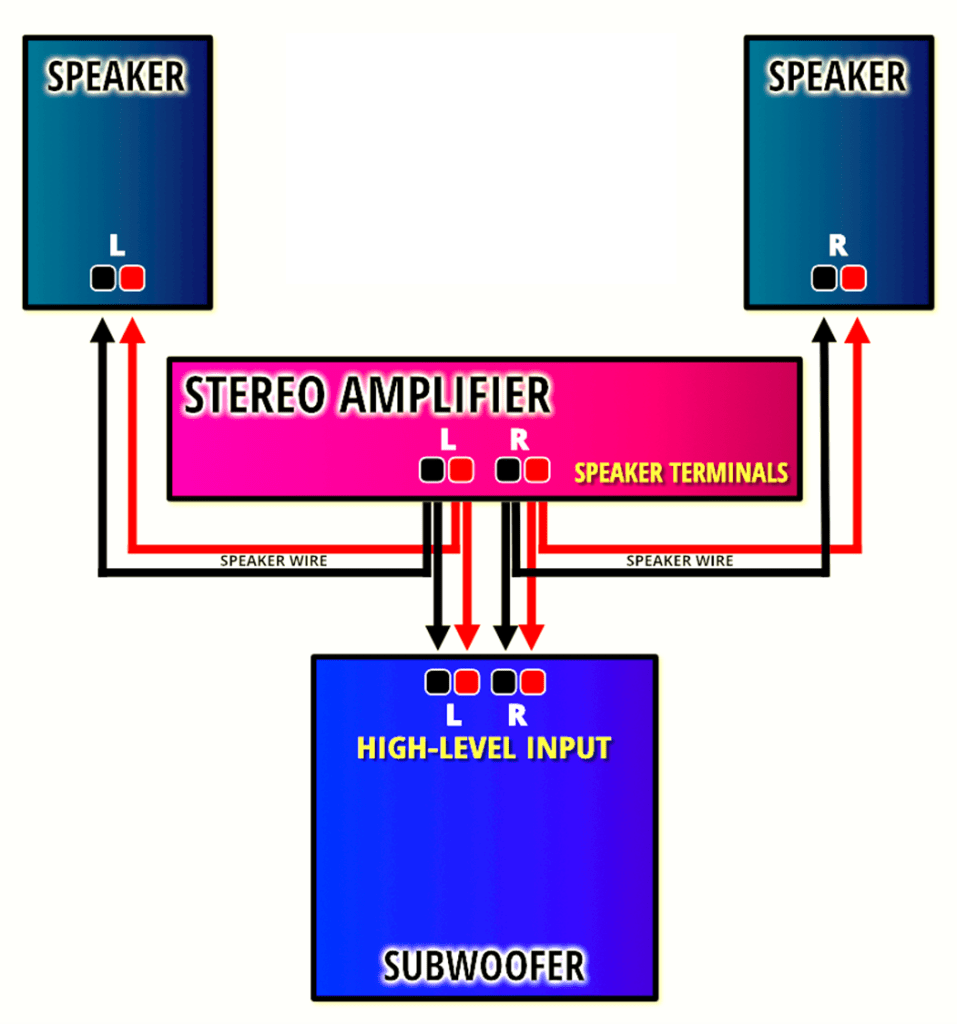
However, if you use an older model, you can establish a connection to your speaker-level outputs by connecting with high-level output connections. With the high-level output connections, you can run your speaker wires and connect to your subwoofer.
2. Confirm the specs of the subwoofer
It is vital to check the specifications of the subwoofer, check for the acceptable inputs and outputs of the subwoofer. This is because you want to be sure of the connections possible to your subwoofer. Look for input/output connection specifications.
Ideally, the input connections must have more than one component. Also, don’t forget to check if the connection is at the front, back, and at both sides of the subwoofer. In most cases, you might find the connection options from the back and front of the subwoofer.
Understanding how your subwoofer works can help you establish a connection that ensures you don’t spend too much money and time setting up a connection. Once you know the devices you are working with in and out, you can easily set up a great connection.

3. Connect two speaker wires to the back and front of the subwoofer on both audio channels
After looking through the specifications of the subwoofer you work with, you can choose to connect the subwoofer to any output of your choice. The options available are using two speaker wires to create a connection or using a speaker connector to do the same thing to your subwoofer.
One of the most used options is to use the wires of the speaker to connect to both parts of the subwoofer. This connection is also needed for the left and right audio channels. For this connection, run the speaker wires from the left and right audio channels to the subwoofer- the connection is similar to when you want to connect your subwoofer.
Run the wire to the back of the subwoofer. This connection can be used to adjust the bass emissions by using the subwoofers filter. You can use a speaker connector alternatively to also create a high-level audio connection. As said earlier, you might use a speaker connector or speaker wires, whatever you use would work just fine.
Remember that the speaker connector should have a cable that connects to the subwoofer in three connecting ends to the receiver. If you want to achieve this connection, you have to find a speaker connection with appropriate connection types.

One other important thing to check is how the connection from the end of the speaker connector is appropriate for your receiver. What you want is the possibility of connecting the speaker connector to the back of the subwoofer input option.
You can then establish the connection by connecting the three other wires. The most popular option most people go for is to connect the wires to the left and right audio positives, while the leftover wire is connected to the negative port.
Connection in this way would allow the subwoofer to receive audio signals that are sent to another speaker thereby creating a speaker-level connection. But the subwoofer would filter the audio signals and emit the tones that are designed to play in the first place. A uniquely LFE audio signal isn’t sent to the subwoofers.
4. Adjust the filter of your subwoofer
You are halfway in the process of securing a connection to speaker level outputs, you might need to adjust the filter on the subwoofer to get a clear and achieved audio. This would ensure that low-frequency emissions are carried out precisely and humming from the ground loop is eliminated. You can adjust the filter to accommodate the bass sounds you want when the subwoofer is working. You can test and find specialty equipment to test the emissions to deliver precise measurements.
5. Your connection is now secure
Since the connection is established, the filter is adjusted and you have checked the bass. You can begin to enjoy the connection that you have created. Connecting the subwoofer to the speaker level outputs by default or choice in anyways, delivers a great boom of the bass of the subwoofer.
What If Your Subwoofer Does Not Have Speaker Level Inputs
Speaker-level inputs and outputs are to make sure the connection is easy to set up and established. Having an already-made subwoofer can make the connection easy and clean because the subwoofer works easily with other existing components that you have. However, your subwoofer or amplifier might not have a subwoofer output.
There is a quick option available if the receiver doesn’t have a subwoofer output. Receivers like this have a Tape Monitor Option. The tape monitor can be connected from the receiver representing a line-level input to your subwoofer. You can see there is no need to throw away your vintage receiver yet.
Your subwoofer might not have speaker-level inputs, a connection between the main speakers to the amplifier would do the trick.
Speaker Level Outputs And How They Work
You might be curious about how the whole connection works internally. How is a connection between your subwoofer and speaker level outputs possible? How does this connection work so that frequencies don’t distort or overlap?
Subwoofers that have speaker-level outputs have high impedance electric circuits inbuilt in them. This electric circuit uses high filter cases to pick up the signals to be used. Using the high pass filter, signals would be passed above a cutoff frequency called the crossover frequency. Therefore, only high-quality frequencies above the cutoff frequency are sent to the speakers.
This also emphasizes the reason for the crossover of your subwoofer. The explanation above doesn’t mean that there is no available low-pass filter that passes through the low-frequency signals. Most of the time, high-quality frequencies are passed, making audio more enjoyable and easy.
These filters pass to the subwoofer’s amplifier and drive the connected speakers.
How Are Signals Separated?
We mentioned earlier that some subwoofers pass low-quality and high-quality filters to the subwoofers. We would learn how the filters are separated to ensure you get a great audio quality.
Some subwoofers have a passive crossover network inside of them. Passive crossover networks allow the separation of speaker-level signals into high and low bands from the receiver. The high-level signals drive to the main speakers and the low-level signals drive to the subwoofer. The crossover network separates the high frequencies for the speakers and low frequencies for the subwoofer.

The crossover network offers great importance to the whole setup, it reduces acoustic interactions if the main receiver and subwoofer try to play the same frequencies. This helps to avoid out of phase or mixed signals out into the listening space.
Subwoofers that have crossover networks tend to be a bit more pricey than the other ones with no crossover network. Separating low and high frequencies are very important when connecting a subwoofer to speaker level outputs to ensure you are not getting some funny audio later.
Setting Up A Subwoofer & Receiver Crossover
The subwoofer can have an internal passive crossover network which establishes which signals get sent to which transducer.
You can also set the receiver’s crossover to off, so low-level signals can be transferred to the subwoofer. After doing this, you can then increase the crossover to 80Hz or so. You can set the sub’s crossover to the roll-off frequencies for your main speakers – its best to check out the speaker’s spec sheets for optimal results. Check out our article on how to set crossover frequencies for speakers in more detail.
Conclusion
Connecting the main speakers to the subwoofers is quite simple. Follow all the above-listed processes diligently. Now that you have created the connections, adjusted filter, tested, and tried out the bass. It is time to enjoy the authoritative, nice bass given off by the subwoofer.
You may also be interested in:
- Subwoofer Crossover Settings – The Ultimate Guide
- How to Set Crossover Frequency for Speakers
- Active vs Passive Speakers – Differences Explained
